Incorrect artwork is one of the most common causes of production delays and quality issues in custom packaging. Files that arrive without proper bleed areas, with RGB colours, or with fonts that are not outlined force the factory to stop production, request corrections, and restart — adding days or weeks to lead times and increasing the risk of errors in revision. Understanding what your packaging manufacturer needs before you send artwork saves time, avoids reprinting costs, and ensures that what you approve on screen is what arrives in your warehouse.

Table of contents
- Start with the dieline
- Bleed and safety margins
- Colour: CMYK, Pantone and screen accuracy
- Logos and vector artwork
- Image resolution
- Specifying finishing effects
- Barcodes and legal text
- Exporting a print-ready PDF
- What to include in your file package
- Pre-submission checklist
- How we can help
- Frequently asked questions
Start with the dieline
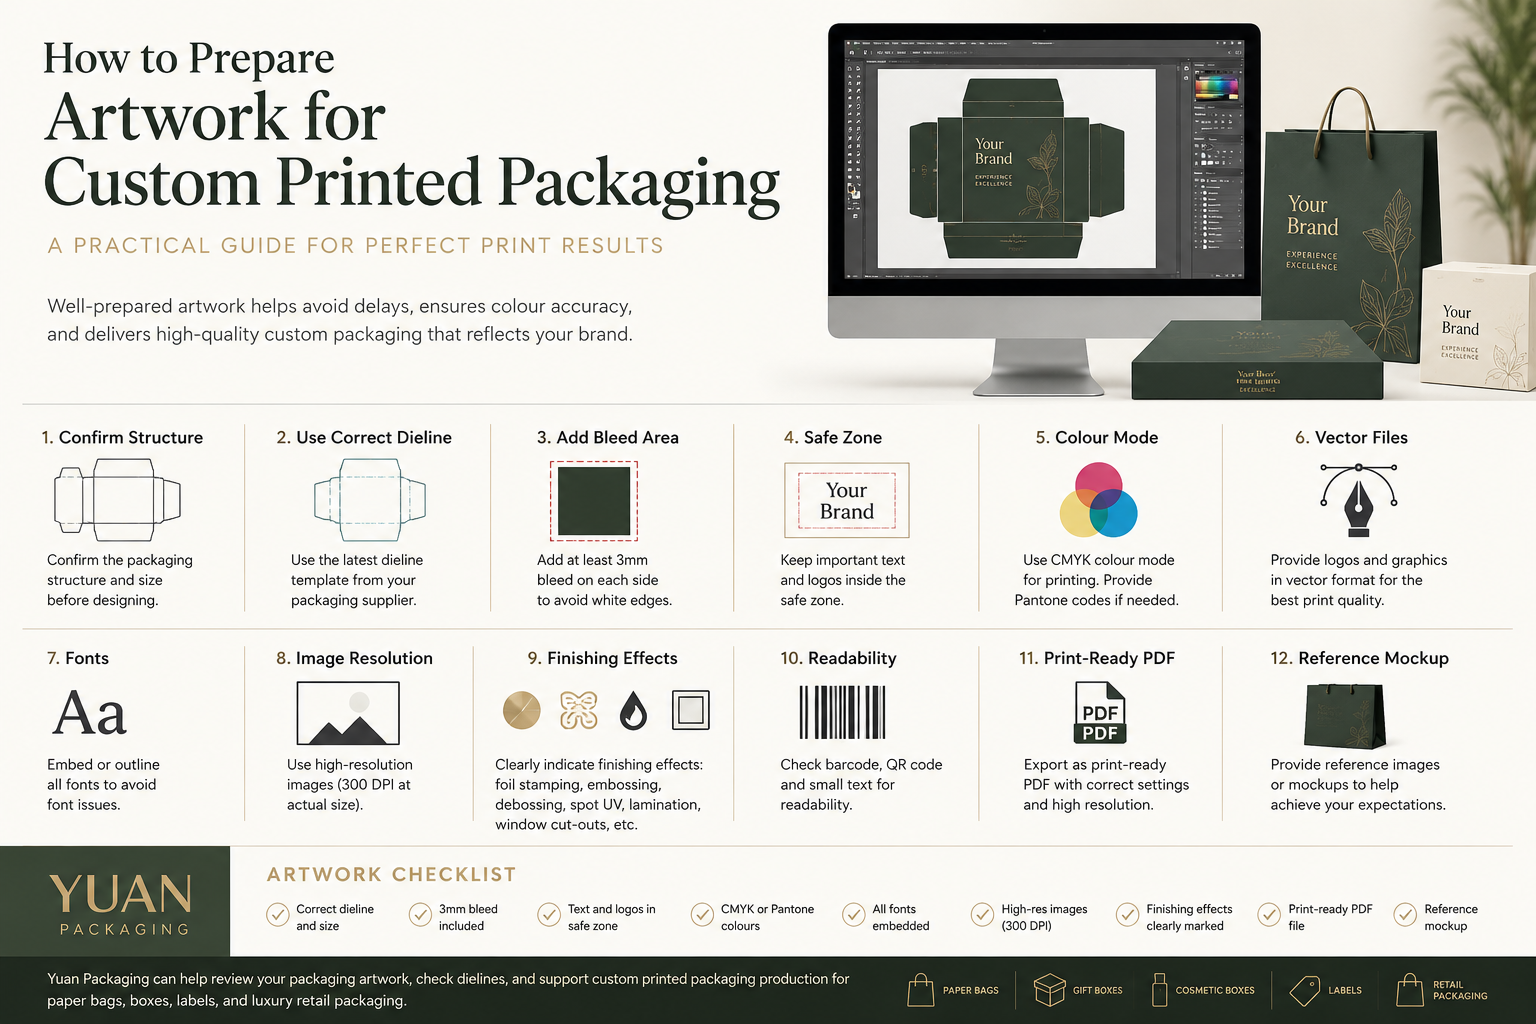
Confirm the packaging structure and dieline before opening a design file. For a folding carton, paper bag, or custom gift box, the physical dimensions — panel sizes, handle positioning, flap depths — must be finalised before a dieline can be issued. A dieline is the flat template showing the exact cut, fold, and perforation lines of the packaging structure. Working from a manufacturer-issued dieline rather than creating your own ensures that artwork fits the actual production tooling and accounts for board thickness, which affects the folded dimensions of cartons and rigid gift boxes. This applies to all packaging types: custom printed paper bags, cosmetic packaging boxes, folding cartons, luxury rigid boxes, and labels.
Bleed and safety margins
Once you have the correct dieline template, set up your artwork with the required bleed area. Bleed is the extension of background colour, imagery, or patterns beyond the trim line — typically 3mm on all sides for packaging. Without adequate bleed, any minor variation in the cutting or trimming process will leave a white edge at the boundary of the printed area. Equally important is the safe zone: the area inside the trim line within which all critical content — logos, product names, legal text, barcodes — must sit. For packaging, a safe zone of at least 3–5mm inside the trim line is recommended, and wider for small carton panels where cutting tolerance has a proportionally greater effect. Placing important graphics too close to the trim edge is one of the most common artwork errors we encounter in production.
Discuss your packaging project
Colour: CMYK, Pantone and screen accuracy
Colour specification is a frequent source of discrepancy between what a brand sees on screen and what appears on the printed packaging. Screen displays use RGB, which can produce colours that offset printing cannot reproduce. All artwork for packaging production should be converted to CMYK before delivery. If your brand uses specific colours that must be matched precisely — a proprietary brand red on a cosmetic packaging box, or a specific gold tone on a fragrance gift box — specify the Pantone colour reference alongside the CMYK build. Pantone colour matching allows the press operator to formulate a specific ink to your standard, eliminating the variability that process CMYK introduces. For luxury packaging where colour consistency across multiple production runs is critical, Pantone specification is strongly recommended over CMYK approximation.
Logos and vector artwork
Logos and brand marks supplied in vector format — AI, EPS, or PDF with embedded vectors — can be scaled to any size without quality loss, ensuring clean edges on foil stamping dies and embossing artwork. Low-resolution rasterised logo files are a very common problem, particularly for small-format applications such as label backsides, carton base panels, or tissue paper printing. If you do not have a vector version of your logo, request one from the designer who created it, or from your brand team, before building artwork. All fonts used in packaging artwork should be either embedded in the file or converted to outlines. Outlined fonts are no longer editable as text, but they are fully self-contained and will not cause substitution errors if the manufacturer does not have the same font installed.
Image resolution
Photographic images used in packaging artwork should be provided at a minimum of 300 DPI at the intended print size. Images that appear sharp on screen can print softly if they were sourced at 72 or 96 DPI, which is typical of images downloaded from websites. For large-format applications such as gift box wrap panels or luxury paper bag surfaces, images may need to be at a higher effective resolution to maintain clarity across the full printed area. If you are using product photography on your cosmetic packaging or retail packaging, have the full-resolution files supplied by the photographer before starting artwork.
Specifying finishing effects
Premium packaging typically includes finishing effects beyond the printed surface: foil stamping, embossing, debossing, spot UV, matte lamination, soft-touch lamination, or die-cut window apertures. These effects must be specified and clearly marked in the artwork file. The standard approach is to create a separate layer in the design file for each finishing effect, using a specific colour swatch — typically a spot colour such as Pantone 877 for foil areas, or a named spot channel for spot UV regions. If finishing effects are not clearly separated in the artwork, the production team cannot generate the correct plates, dies, and screens, and the job will require revision before production can proceed. A brief specification note identifying each layer and what it represents is always helpful.
Barcodes and legal text
Barcodes, QR codes, and small-print legal text require specific attention in packaging artwork. Barcodes must be built to specification — correct symbology for the target market, appropriate quiet zones on all sides, and at a size that allows reliable scanning in retail conditions. A barcode that is too small, printed in an insufficiently contrasting colour combination, or placed on a dark or patterned background will fail scanning. If you are uncertain whether your barcode specification is production-correct, share it with your manufacturer before artwork is finalised. The same applies to QR codes, which must have sufficient module size to scan reliably on the packaging material and surface finish specified.
Exporting a print-ready PDF
Export your final artwork as a print-ready PDF, ideally to the PDF/X-1a or PDF/X-4 standard, which ensures that all fonts are embedded, images are at full resolution, and colour spaces are correct. If your design file contains linked images, collect all linked assets before exporting. Where available, include the original editable file — an Adobe Illustrator (.ai) or InDesign (.indd) file with all linked images and fonts — alongside the PDF. This allows the factory's prepress team to make minor technical adjustments without requiring a revision from you. Reference images, product photography, or physical mockups, if available, are also valuable for communicating the intended visual result, especially for complex finishing combinations such as foil stamping over soft-touch lamination.
What to include in your file package
When submitting artwork to your packaging manufacturer, prepare a complete file package. Include: the print-ready PDF as the primary production file; the original editable vector file if available, such as an Adobe Illustrator AI file; all linked image files at full resolution; fonts or, preferably, a file version with all fonts outlined; the manufacturer-issued dieline file; reference images or mockups illustrating the intended result; and Pantone colour codes for any spot colour or matched ink requirements. Providing this complete package at the outset avoids the back-and-forth that adds unnecessary time to project timelines.
Pre-submission checklist
Before sending artwork to your packaging manufacturer, run through this checklist. Artwork is built on the manufacturer-issued dieline, with all construction lines on a separate clearly labelled layer. Bleed extends at least 3mm beyond all trim edges. All critical text, logos, and imagery sit within the safe zone. All colours are in CMYK or specified as Pantone references — no RGB values. Logos and brand marks are in vector format. All fonts are embedded or outlined. Photographic images are at least 300 DPI at print size. Finishing effects — foil stamping, spot UV, embossing, debossing, window cut-outs — are on clearly labelled separate layers with correct spot colour swatches. Barcodes and QR codes have been verified for correct symbology, size, and quiet zones. The final file has been exported as a print-ready PDF.
How we can help
Yuan Packaging can help review your packaging artwork, check dielines, and support custom printed packaging production for paper bags, boxes, labels, and luxury retail packaging. If you are starting a new packaging project or transitioning a specification to a new manufacturer, our prepress team is available to advise on artwork requirements specific to your packaging structure and surface finish.
Frequently Asked Questions
What file format should I send for packaging artwork?
Submit a print-ready PDF (PDF/X-1a or PDF/X-4) as the primary file. If possible, also include the original editable file (AI or INDD) with all linked images and fonts outlined.
How much bleed is needed for custom packaging?
Standard bleed for packaging is 3mm on all sides beyond the trim line. Critical content such as logos and text should sit at least 3–5mm inside the trim line (safe zone).
Should I use CMYK or Pantone colours for packaging?
All artwork should be in CMYK. For brand colours that must match precisely across production runs, specify Pantone references alongside the CMYK build. Pantone is strongly recommended for luxury packaging.
What resolution should images be for packaging printing?
All photographic images should be at least 300 DPI at the intended print size. Images from websites (72–96 DPI) will print softly and should not be used.